ImageHost.orgImageHost.orgImageHost.orgImageHost.orgImageHost.org
Showing posts with label recipie. Show all posts

Thursday, July 7, 2011

2 Ingredient Truffles

How was everyones 4th? Did you all have fun, food, & Family? We sure did and not to mention we had some awesome fireworks! I did break down and make Miss A a shirt, I will add a little tutorial for you soon, here in Utah we still have the 24th to celebrate too! I thought I would share an easy recipe that reaps LOT & Lots of Praise! Besides it is super easy and cheap!

Do you have a love for the truffles but they all seem like a lot of work? Well these are defiantly the ones for you. They take little time and you only need 2 ingredients!  I found these when looking for fun treats for a cookie exchange I went to a while back. They are so easy and yummy. I think just the name Truffles People assume you went to lots of work ;)
Items Needed:
  • 1   8oz pack of Cream cheese
  • Chocolate (1 pkg of almond bark or 2 1/2 boxes of melting chocolate)
Start with whipping your cream cheese, while that is whipping melt half of your chocolate. Set the other half aside that is what you will coat your truffles with. I melted my Chocolate in the microwave 2 minutes and stirred and did 30 second intervals until it was all melted. Add the melted chocolate to your cream cheese and mix wellDSC08331AT this point you can go onto the next step and keep it 2 Ingredients or I like to try my luck and test different combos. I have added some mint extract to make them mint truffles, I have also whipped in a 1/2 cup of creamy peanut butter (my husband and his work favorite!). If you want 2 types simply split the mix here and add different flavors (I am going to try orange next!). Next once you decide what flavor you would like and it is mixed in  scoop out your mix onto wax paper. I use a mini scoop so they stay similar in size. you can also use a spoon and drop them onto wax paper. DSC08335Refrigerate the balls for about 1 hr until firm enough to hold their shape in melted chocolate. I usually shape them into better ball shapes before I dip them. Melt your other half of chocolate, I added a little shortening because a very wise woman (Tara’s Mom!) told me a little shortening in your melted chocolate gives it a shinny coat!DSC08327Dip then decorate! You can add sprinkles to pretty them up,  I added some melted peanut butter to the peanut butter ones. You can also roll them in powdered sugar and coco powder if you don't want to dip them! DSC08339 Stand back and enjoy the praise!

Wednesday, April 13, 2011

The New Brownies

Sunday was barbeque day at the Husbands work again. When he called me Saturday morning to see what I would make he was smart and volunteered me for a desert again. I knew exactly what I wanted to make! Have you seen all the yummy hidden treats around blogger land lately. Well I have a new one for you!
What you will need:

DSC_1623 I know I have your attention now! Seriously these 3 items are awesome by themselves but wait until you add them together! OH YEAH!!
To get your Brownies, mix just like the box says. When it is all mixed up add 1/2 cup of marshmallow crème. Then you need to open the Oreos (try to refrain from eating all of them or maybe that was just my little assistant!). Simply dip your Oreos into the batterDSC_1624Then place them into a VERY greased muffin pan. DSC_1630Bake at 350* for 12-16 minutes until brownies are cooked. Then removed and let them cool an additional 5 minutes in the pan.  DSC_1632[3] I ran a knife around them and popped them out. And how can I express how delectable these were…. Well I don't even have a finished picture! Ha Ha they went to fast! Guess that means I will have to make some more and share a complete picture!! But seriously the mint brownie on the inside makes these so yummy! Even the anti brownie husband enjoyed them.


Oh and while I still have you Week 2 is well under way over at
imageGO VOTE! See if you can pick which one is mine? I won last week with my Jenga Mirror! Hopefully I make the cut this week too! Which are your favorite? Plus they have a new season auditions starting on Today the 13th!
 kori

Monday, March 28, 2011

Cookies and Cream

DSC08597I was looking for a quick treat for the family and I was about to throw out some harden but still fresh cookies when this little idea entered my head. So I reached for some white chocolate and crushed up those hard cookies. DSC08578 Simply mix the crushed cookies and white chocolate and pour into your favorite silicone mold.DSC08579 Let cool and in less then 15 minutes you have some delectable cookies n' cream chocolates! DSC08599
~Enjoy,  Kori

Thursday, March 17, 2011

PB & J Doughnuts

With me and my little family in the process of moving its really hard to do craft projects. Most of my stuff is packed up so that's why all my recent posts have been food. I will have an area all to my own for crafts but for now i wanted to share a treat i made for my man.
After reading Simple Sweetness and seeing her post on Peanut Butter and Jelly Cupcakes it reminded me of an episode on The Best Thing I Ever Ate. They showed these doughnuts from The Doughnut Plant that were a PB & J doughnut. The owner said it was a top secret way to get the doughnut filled but i thought it cant be rocket science. I decided to make a treat for my husband and since he loves Peanut Butter i thought i would try to make my own PB & J doughnut. Do you want to see my top secret way to fill a homemade doughnut?
DSC_0299 fixed  
I used a recipe that my mother had for doughnuts. We tried both a cake doughnut and a yeast one but the yeast doughnuts were so much easier and they turned out so much better. Im sure most of you have a doughnut recipe any recipe will work. If anyone wants the one i used i will be more then happy to share just let me know.
DSC_0292
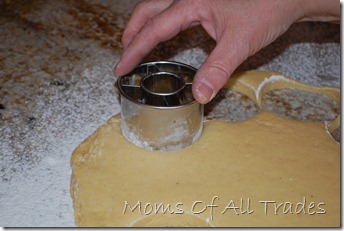
We used her doughnut cutter but they puffed up on us so much you couldn't see the hole but this cutter saved us a lot of time.
DSC_0291
After we cooked and let the doughnuts cool i used one of those frosting tubes but filled it with strawberry jelly and stuck it through the doughnut and injected it with the jelly. I used a longer skinny tip and inserted it twice just opposite from each other. In the same hole i ejected the jelly on two sides. I hope I'm explaining this right I basically made a v shape and then turned the doughnut to make another v shape so the whole doughnut had jelly running through the inside.
DSC_0298
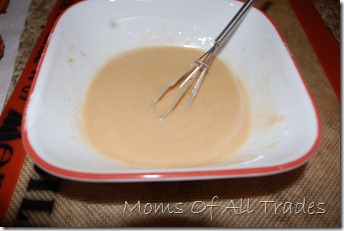
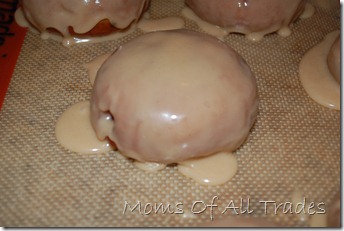
Now it was time for the fun part! We made a peanut butter icing. We just used a simple icing (powdered sugar and milk)recipe and added a lil bit of warmed peanut butter. We didn't measure that we just added according to taste. We dipped each doughnut in the warm icing.
DSC_0299
They looked pretty good knowing the fact that i have never made a homemade doughnut before.
DSC_0300
I grabbed one of the doughnut holes and quickly ejected it and dunked it in the icing so i could open it up to show you and to taste them. They tasted so good basically a sweeter PB and J sandwich
DSC_0301
My husband was in heaven! He wants me to make them for his work so i will be making them again soon. I hope you enjoyed it and let me know what you think!
-Tara

Wednesday, March 16, 2011

Take 5 Redemption

DSC_0484Ok after totally feeling like a failure I have redemption! These could NOT be easier to make and the outcome…AMAZING! They are so much like the real thing you will love them. Well you will love them if you are a fan of Take 5 bars!
Items Needed:
  • Pretzels
  • Peanut Butter
  • Caramels
  • Chocolate for melting
To start off grab a cookie sheet and lay out your pretzels. Next swab on some good old peanut butter to each. I used an old baby spoon and it worked great.DSC_0470Next melt some caramels. I bought a bag of the melting caramels and melted half the bag. Just scoop on enough on each pretzel over the peanut butter and let cool. This was where I played around, notice I added a another pretzel on top. Mainly I wanted to see if more pretzel was better.DSC_0476After the caramel has cooled melt your chocolate. I used a 1/2 of bag of chocolate chips and that was plenty. The results a very quick and easy Take 5!    DSC_0489 See I told you it was easy and no measuring! These are my favorite kind of recipes! What’s your favorite Candy Bar or Candy? Any suggestions for my next attempted master pieces/ possible failure!!! Just kidding we would love any suggestions you would like us to try!
~Enjoy, Kori

Tuesday, March 15, 2011

Take 5 & Failures

DSC_0442 Every Sunday at the Husband’s work they have a barbeque and each bring an item. I volunteered a desert as I have said many times I CANT cook. Well after this recipe I am double checking my ability to bake!

I searched the internet for a Take 5 recipe and read a lot of reviews, I found one and got excited and went to work. I dreamed of how amazing these would be as the melted in my mouth like my favorite candy bar. Well after leaving them in the fridge like the recipe this is what I got…FAIL!DSC_0445 It was gooey and never set up, they were super tasty but oh so messy. I even gave it an additional hour and still messy. So a light bulb went off and I thought I will just whip them into some cupcakes and have a sweet little inside surprise (keep in mind this is 9 o’clock at night. I whipped up some cupcakes with a tasty little treat inside.DSC_0448 They came out and I quickly cooled them and decorated them with some super fun Sprinkled marshmallows. Have you tried this? Just cut marshmallows and then dip them in sprinkles. Make sure to dip your scissors in water after each cut that way they don't gum up.DSC_0461  Well I packed them up (with out tasting them) and left them so proud that the Husband would have a fun treat for work in the morning.DSC_0457Well the next morning I couldn't resist and tried one…NASTY! Seriously it tasted like a bacon chocolate cupcake. I feel horrible that I sent them to work but the guys ate them. I must redeem myself and find me a good recipe!

So after this EPIC FAILURE, Take 5 (pun intended!) and tomorrow I promise I will have a new and tasty recipe for some good old Take 5 bars.

~Enjoy, Kori

Sunday, March 6, 2011

Patty-Cakes

Pancakes at our house aren't your typical pancake. I like to make our breakfast a theme. I have made pancakes look like fireworks, Christmas trees, team logos and even on the day of our town celebrations i made a lamb but with St Patrick's day coming up i decided to do “patty cakes”.
DSC_0263
I thought we could start our morning off with a pot of gold!
DSC_0257
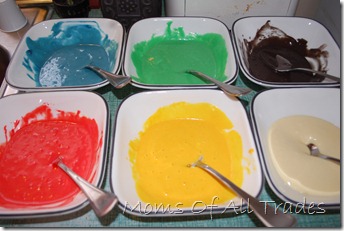
I separated the batter into 6 different bowls and made each a different color
Disposable%20Decorating%20Bag
These disposable decorating bags are a life saver and i use them for all sorts of thing other then just cake decorating.
DSC_0259
See all the fun colors! it is important to have all your colors in the bags and ready to pipe.
DSC_0260
I started with the cloud
DSC_0261
Then the pot but make sure to fill it with gold! ha ha
DSC_0263
Then add the rainbow!!! Isn't that the cutest pancake ever or should i say patty cake
DSC_0265 
I tried shamrocks but one looks like a butterfly with a tail and the other looks like a huge mallet but hey i tried!
DSC_0267
Since i had yellow left over i decided to make some gold coins!

Thanks for stopping by!
DSC_0273
-Tara

Come Join us, we are linking to these great Parties

Thursday, March 3, 2011

Easy a Cake, Thin Mints

DSC08590As promised here is a Thin Mint recipe for you all to enjoy! I promise I am not trying to put the Girl Scouts out of business! My body just knows it is that time of year for these delectable morsels! I searched the internet and all of the wonderful recopies' that were out there, I debated  which one I would choose. Then as I sat last night talking to my husband I decided I knew how I was going to make them! These are  the easiest recipe, you will use a cake mix (get the title easy as cake! ha ha) and they taste AMAZING!
Items needed:
  • Chocolate Cake mix ( I prefer Betty Crocker's Triple Fudge, more chocolate!!)
  • 1 egg
  • 1/2 cup butter
  • Chocolate Bark (to melt and dip cookies in) or a bag of Andes' Mints would work.
  • 3 Tsp of Mint ExtractDSC08569
I made the cookie inside the Thin mint by melting the 1/2 cup butter, then add the cake mix and egg. Once it is complete mixed add 2 tsp of Mint Extract. Then simple scoop into little balls on to your cookie sheet. I used a mini scooper just so mine were a little more even.DSC08570 Bake at 350* for 8-10 minutes. Remove and let cool. At this point they will smell incredible, buy try to refrain from eating them all. DSC08572Next up melt your chocolate bark, I used a complete package. Add your last Tsp of mint extract to the chocolate. Or if you can find the Andes' baking mints, I imagine they would be good too. Simply Dip all of your cookies and let cool in refrigerator. DSC08590These were so yummy! Using the cake mix it made 50 cookies. I had to send most to work with my husband or I would have polished them off all by myself!!
The diet starts Monday right! ;)
~Enjoy,  Kori
Come Join us, we are linking to these great Parties

Sunday, February 27, 2011

Mom Tested Family Approved!

Have the rest of you been craving Girl Scout Cookies like my family has? Seriously they can not come quick enough! Well I happened upon this fun little blog A Bicycle Built for Two, well Cait posted a yummy Samoa Girl scout cookies and i had to try them out, but I also added my own twist pretzels instead of coconut.DSC08546
The recipe was super easy and lots of good pictures to follow along.  The Hubs and I dislike coconut and that is really our only downfall with Samoa's so we changed Cait's recipe and substituted the coconut for crushed up pretzels, YUM!I also made then bigger then the usual size!  We tried this on friends and family and all were very satisfied. I just really need to work on my food pictures!  Now on to try some Thin mints!
~Enjoy, Kori

Monday, February 21, 2011

Cake Squares

Okay so this little treat is something we came up with after thinking about fun treats for birthdays. I absolutely love Bakerella! Her famous Cake Balls are to die for and if you haven't made these go check out her site, bake a cake and make these for a loved one or even just for yourself. Anyways my older brother doesn't like chocolate cake can you believe it? We were thinking of things to make for his birthday cake we decided why not make the cake balls and instead of chocolate cake use a different kind of cake. Even though his birthday is way past i thought i would still make them. Well our first stray from perfection was lemon cake. It was AMAZING!

DSC_9850

I'm not very good at dipping chocolate and they don't look professional but one taste and ill have ya hooked

DSC_9790

I take the easy way and just make a store bought cake. The lemon frosting was what really made it go over the top and since nothing goes better with lemon then semi sweet i grabbed a bag of that.

The rest is cake(pun was intended) just bake a cake, destroy it, add frosting and roll them out.

DSC_9796

I didn't have any lollipop sticks left and i didn't have the patients to roll each cake ball this time so i used a silicone brownie bite tray and threw them in the freezer. I like to leave mine overnight it makes them so easy to dip.

DSC_9848 

After dipping them in the semisweet chocolate i swirled a little white chocolate i colored yellow to let people know they were lemon.

DSC_9850

They were heaven. I took some over to my mother as a little thank you for watching my kiddo and my father just kept saying wow these are good.

My mother and i decided a cherry cake would be the next experiment. We even thought Carrot cake with cream cheese or for a surprise for my hubby we would try the rainbow chip(his all time fav). Let us know what kind of cake you would try!

-Tara

Related Posts Plugin for WordPress, Blogger...